한국어Contact us
EVOCAM HALO Controller
Home › Products › Machine Vision › Software
Software#SEIL TECHNO

EVOCAM HALO Controller

Control, measurement, code reading and inspection reports for the EVO Cam HALO digital microscope

PC software that controls the EVO Cam HALO digital microscope and handles imaging, measurement, calibration and inspection reports in a single window. It also reads QR codes, barcodes and Data Matrix codes straight from the live image.

DeveloperSEIL TECHNO CORP. (in-house)
DeviceVision Engineering EVO Cam HALO
ControlZoom, focus (auto / manual), exposure, lighting, Focus Stacking
MeasurementLength, angle, circle; edge-detection measurement
Key featuresScreenshotsUser guideSpecificationsApplications

Setup examples

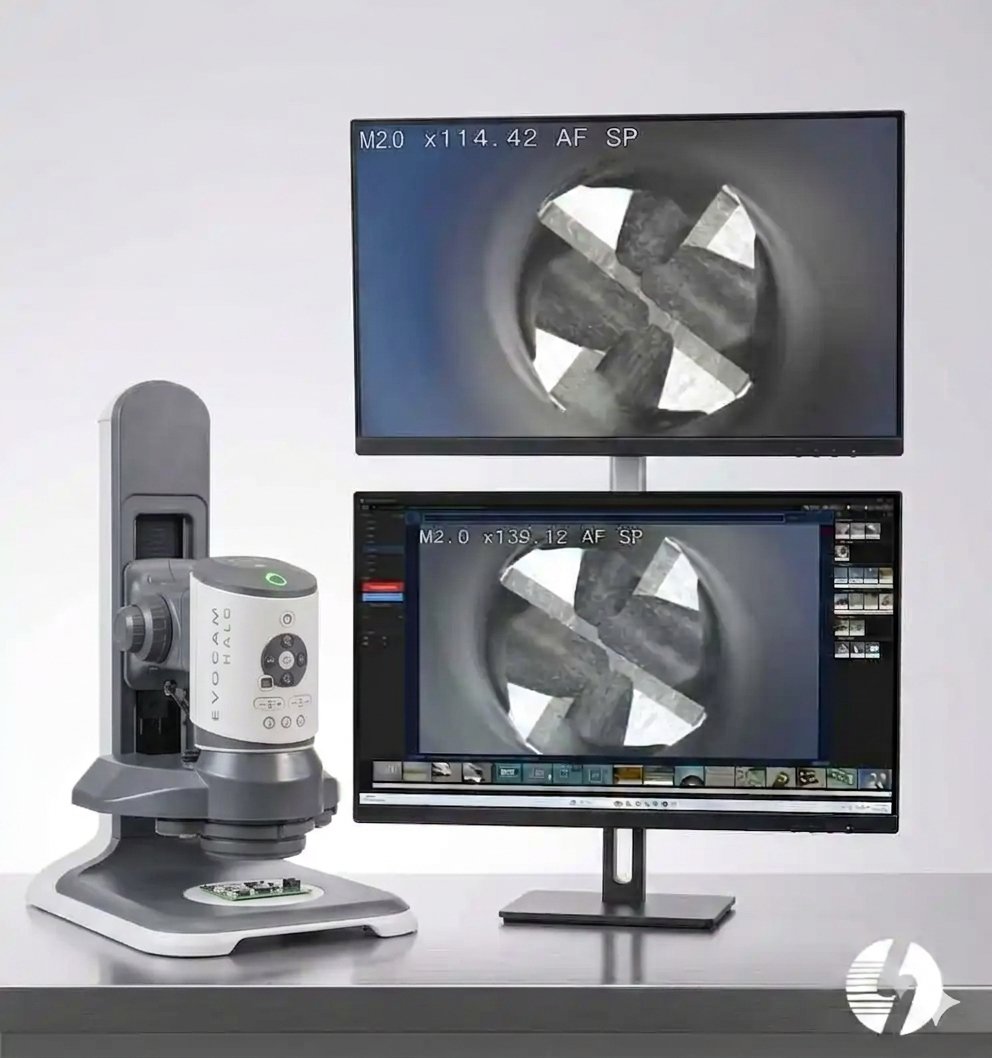
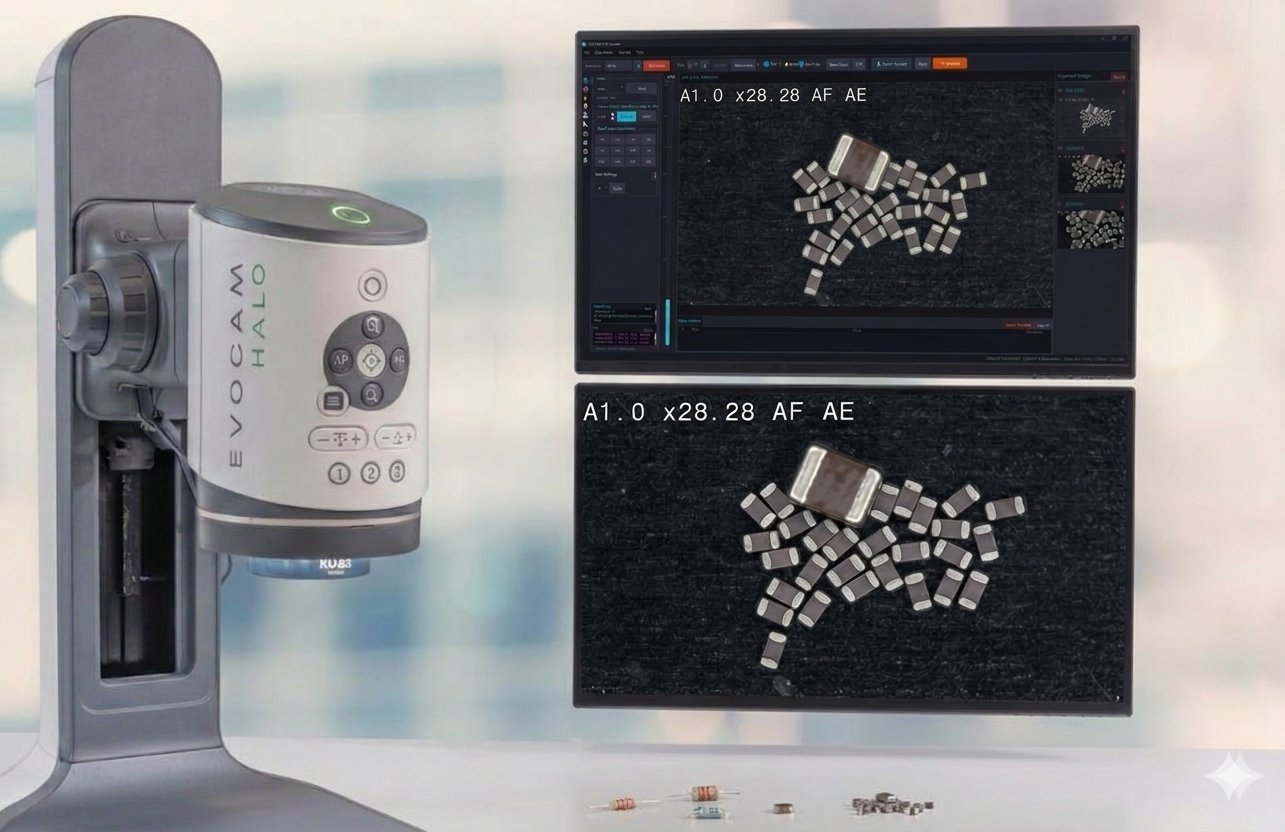
Examples of EVO Cam HALO used with two monitors. Click a photo to enlarge it.

Inspecting end mill flutes — top: live video monitor / bottom: PC software screen
Inspecting MLCC chips — top: EVOCAM HALO Controller screen / bottom: live video monitor

Key features

01

Microscope control

Operate zoom, focus, exposure and lighting from the PC, with auto / manual focus and Focus Stacking (merging several focus levels).

02

Code reading from the image

One click reads the QR code, 1D barcode or Data Matrix (including laser dot-peen marks) visible in the live image — useful for codes marked directly on parts that a reader cannot scan.

03

Two report modes

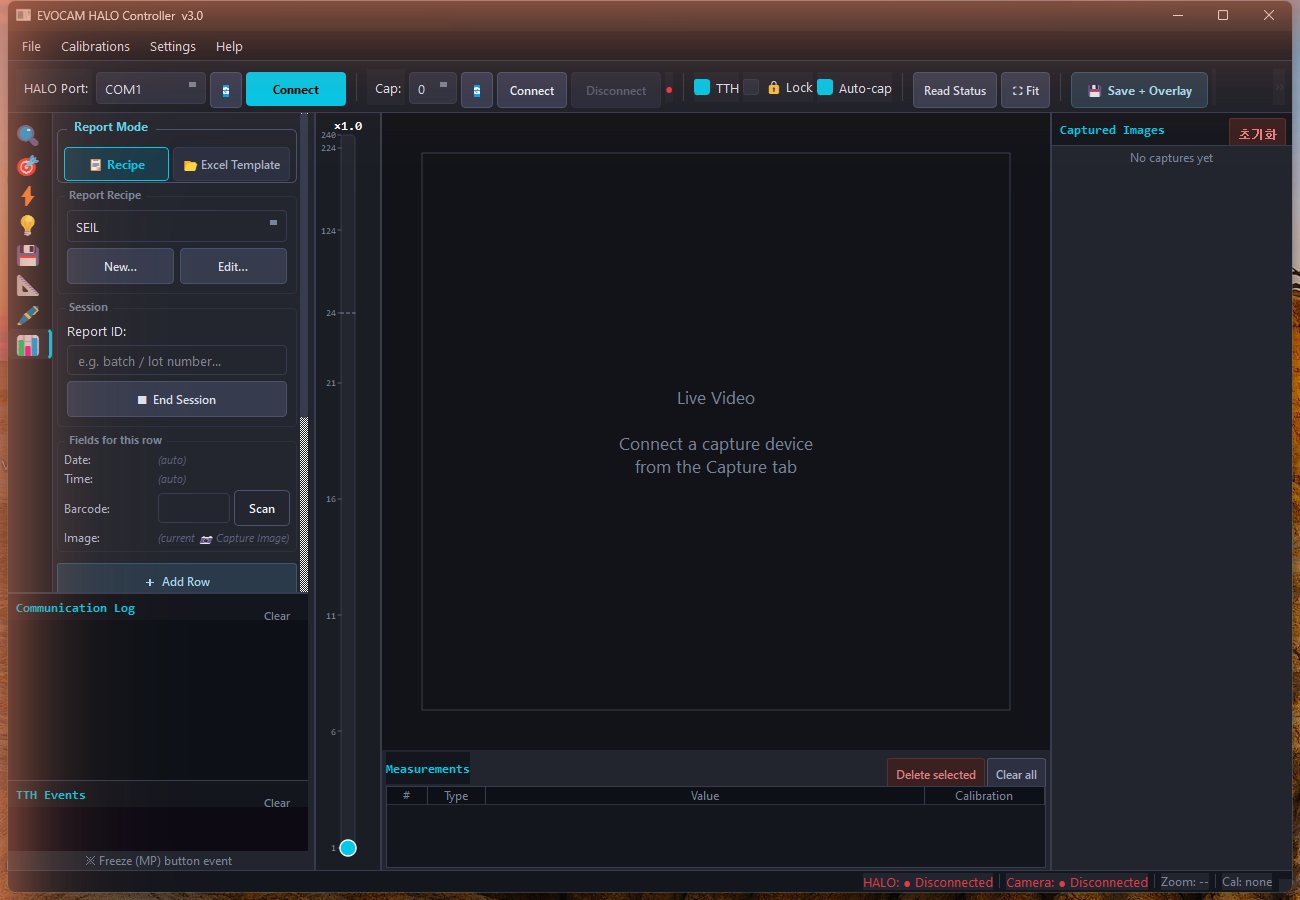
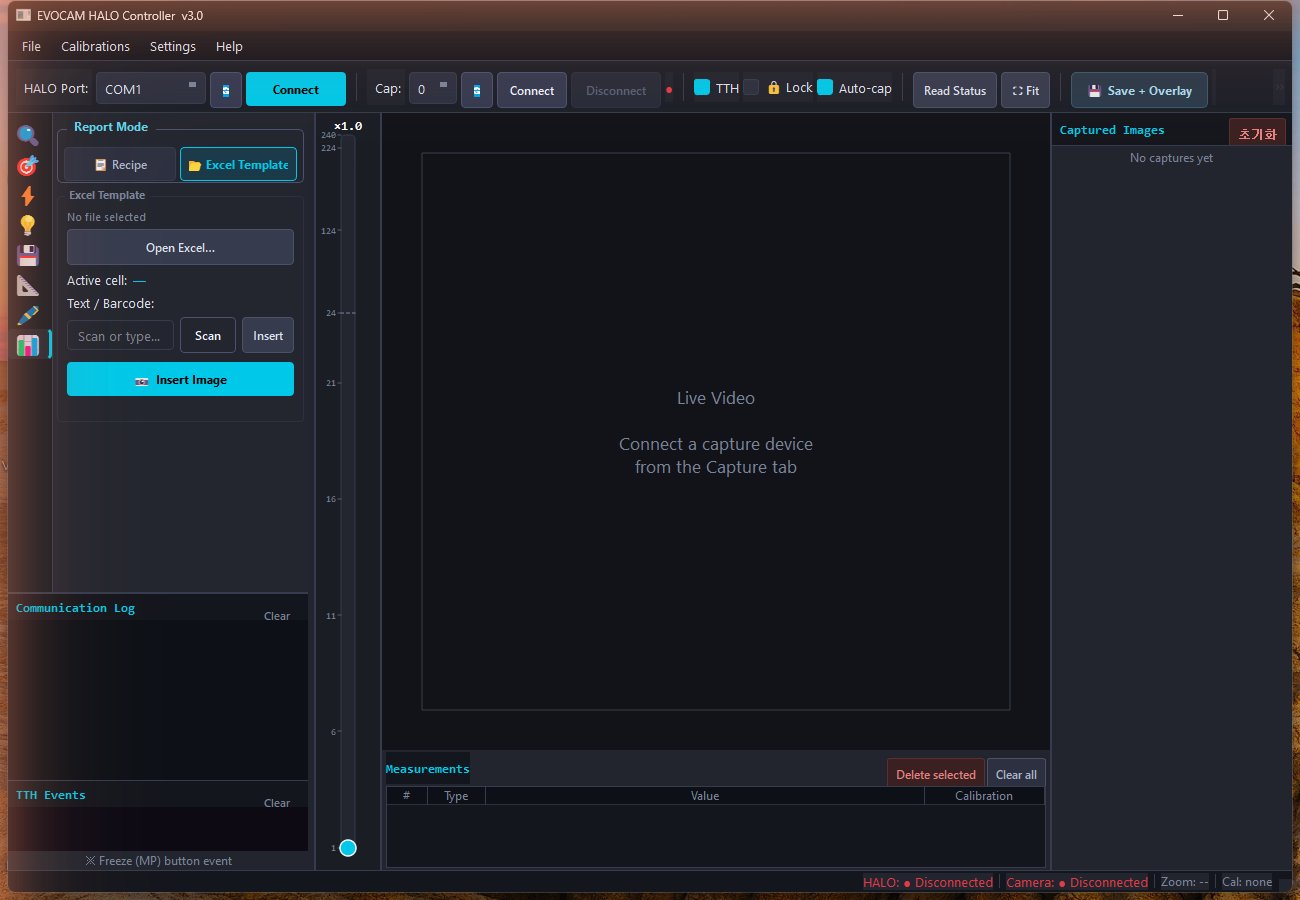
Recipe mode collects "scan, capture, add row" into one session and exports a single Excel file; Excel Template mode writes values and images straight into the selected cell of an open template.

04

Precise calibration

Besides two-click calibration, Edge Line, Edge Circle and Ruler (automatic scale detection) methods save a calibration for each lens and zoom combination.

Screenshots

Actual screens of the software.

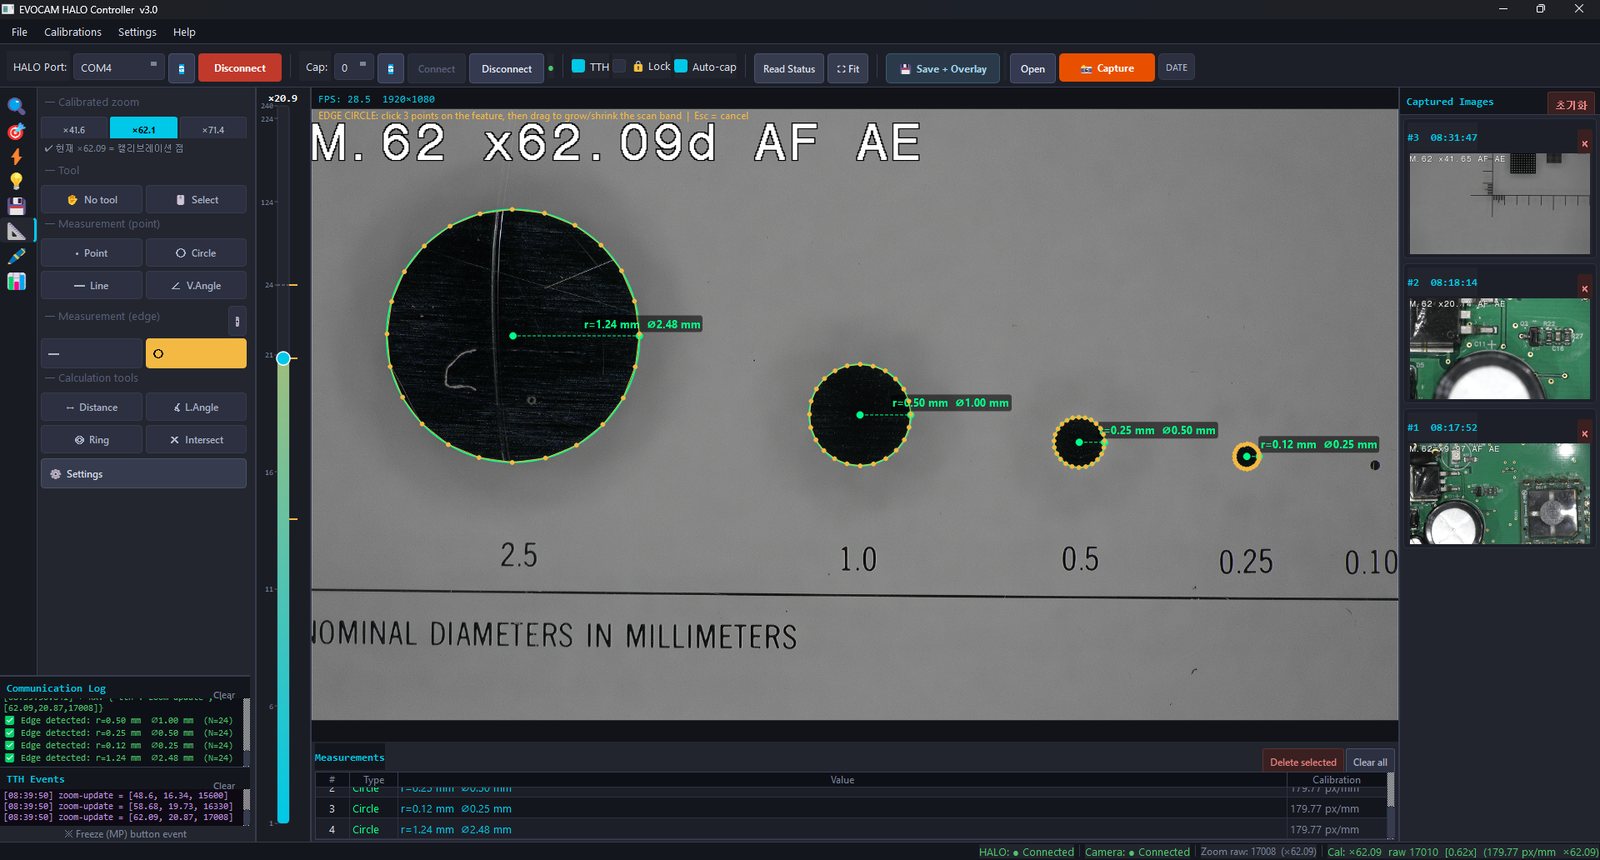
Live measurement
Live measurement

Measure and capture directly on the HALO live image.

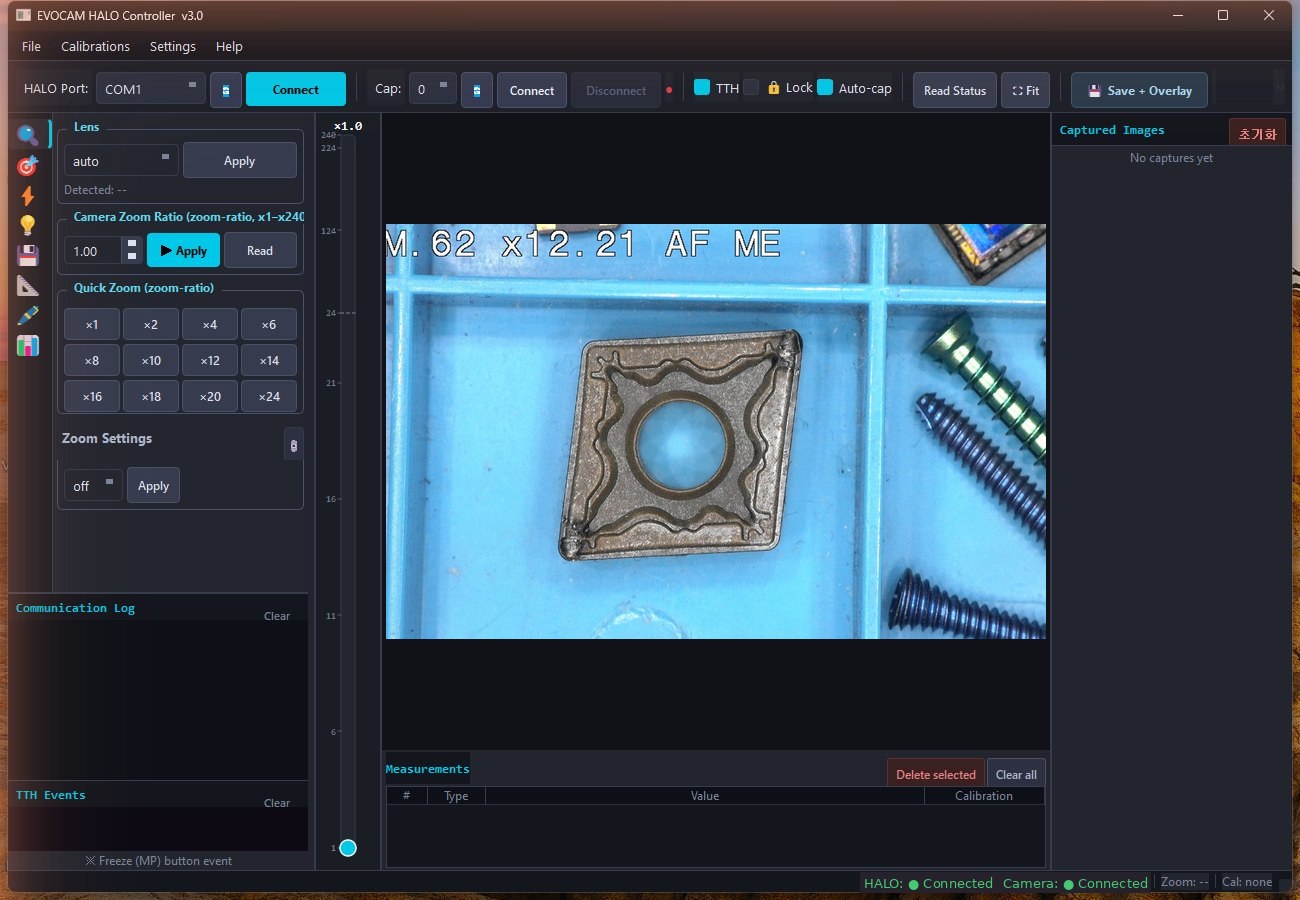
Main window
Main window

Top toolbar, control tabs on the left (Zoom · Focus · Exposure · Light · Measure · Report), live video in the center, captured images on the right.

Report — Recipe mode

Build up a session with the Barcode field and Scan button, then export it to one Excel file.

Report — Excel Template mode

Insert values and images directly into the selected cell of an open Excel template.

User guide

The user manual (v3.0), feature by feature, with real operation videos and screenshots. Videos play silently when they scroll into view; click a screenshot to enlarge it.

STEP 01

Screen layout

Top toolbar, control panel (tabs) on the left, live video in the center and the captured image list on the right. From connecting the device to imaging, measuring and reporting, everything happens in one window.

  • HALO Port / Cap Connect — connect the HALO device (COM port) and the camera
  • Capture · Save + Overlay — capture the current frame, or save it with the measurement overlay
  • DATE — stamps the capture date and time in the top-right corner of saved images
  • Left tabs — Zoom · Focus · Exposure · Light · Save · Measure · Annotate · Report
  • Click a thumbnail in the captured list to open it at full resolution
STEP 02

Lens · zoom

In the Zoom tab, set the lens and the camera zoom ratio, and jump to frequently used magnifications with the Quick Zoom buttons.

  • Select the lens, then enter and apply the camera zoom ratio
  • Quick Zoom buttons move to a preset magnification instantly
  • The live image shows the current magnification and focus / exposure status in the top-left corner
▶ 0:43
STEP 03

Focus · Focus Stacking

Switch between auto (AF) and manual (MF) focus. For samples with height differences, Focus Stacking merges several focus levels into one image that is sharp all over.

  • Auto / Manual focus
  • Focus Stacking — merging several focus levels
▶ 0:50
STEP 04

Exposure · lighting

Adjust brightness and lighting for the sample in the Exposure and Light tabs. Camera mode, mirror / flip, noise reduction and color gain are changed in Image Settings.

  • Exposure settings, lighting brightness and direction
  • Image Settings — camera mode, Mirror / Flip, noise reduction, color gain
▶ 1:06
STEP 05

Saving and loading presets

Save frequently used viewing conditions to Preset 1–3 and recall them with one button, so you do not have to set them up again for every part in repetitive inspection.

▶ 1:10
STEP 06

Measurement — length · angle · circle

In the Measure tab, measure length, angle and circles with two clicks. Results collect in the measurement list below, and Save + Overlay saves the image with the measurement lines.

  • Distance · Angle · Circle and other measurement tools
  • Calibrated zoom buttons jump straight to a calibrated magnification
  • Line color and width, decimal places and unit are set in Settings › Measurement
▶ 2:19
STEP 07

Edge-detection measurement

The software finds the edge automatically, reducing errors caused by where you click. It quickly measures the diameter and position of features with clear edges, such as round holes.

▶ 0:27
STEP 08

Annotate

Mark defect locations or add notes with text, shapes and arrows in the Annotate tab. Click with Select and drag to move them.

  • Color, line width, font size and double-headed arrows are set in Settings › Annotation
▶ 0:59
STEP 09

Inspection reports (Report)

Choose the mode that suits your workflow. Recipe mode repeats "scan barcode, capture image, add row" and exports the session to one Excel file; Excel Template mode inserts values and images into the selected cell of a template that is already open.

  • Define the columns (date, barcode, input, defect type, image, etc.) in the Recipe Editor
  • Start Session → scan, then Enter or Add Row → Export…
  • Scan button — reads the QR code / barcode / Data Matrix (including dot-peen marks) in the live image
  • Excel Template mode requires Microsoft Excel on the PC
▶ 1:01
STEP 10

Calibration

Create calibrations from the Calibrations menu; they are stored per lens and zoom combination. Besides the two-click (Manual) method, Edge Line, Edge Circle and Ruler (automatic scale detection) are supported.

  • When you change magnification, check that a calibration exists for it
  • Manage lists the calibrations by magnification — Jump moves to one directly
  • Yellow marks on the zoom gauge show the calibration points
STEP 11

Save settings · backup

In Settings › Save, choose the save folder, whether every Capture is saved automatically, and the file format (PNG lossless / JPEG smaller files). Calibrations, settings and report recipes can be backed up to one zip file and restored.

  • Calibrations › Backup All Settings… / Restore Settings…
  • The state just before a restore is kept automatically, so it can be undone
  • Calibrations belong to a specific device and lens; restoring them onto another device may give values that do not fit

Overview

EVOCAM HALO Controller is PC software developed by SEIL TECHNO to make the Vision Engineering EVO Cam HALO digital microscope easier to use. Microscope control, measurement and inspection records are brought together in one window instead of separate tools.

Codes that ordinary readers struggle with — such as Data Matrix marks made directly on parts — can be read from the microscope image and recorded in the report together with the measurement results.

Specifications

DeveloperSEIL TECHNO CORP. (in-house)
DeviceVision Engineering EVO Cam HALO
ControlZoom, focus (auto / manual), exposure, lighting, Focus Stacking
MeasurementLength, angle, circle; edge-detection measurement
Code readingQR, 1D barcode, Data Matrix (read from the image)
ReportsRecipe (session) / Excel Template (live cell insert)
SystemWindows 10 / 11; Excel Template mode requires Microsoft Excel

※ Specifications are subject to change without notice. Please contact us for details.

Applications

Visual inspection of electronic partsPart code reading and traceabilityInspection reportingMicroscope measurement

Want to see it in action?

Send us your samples or visit us, and we will demonstrate it for you.