한국어Contact us
VISION-MANAGER
Home › Products › Machine Vision › Software
Software#SEIL TECHNO

VISION-MANAGER

Microscope image capture, measurement and reporting software · Free download

In-house software by SEIL TECHNO that shows the live image from a microscope camera, captures images, measures lengths, circles and angles on screen, and records the results as images and Excel reports. Free to download and use.

DeveloperSEIL TECHNO CORP. (in-house)
SystemWindows 10 / 11 (64-bit), 8 GB RAM or more recommended
Display1920 × 1080 or higher (Windows scaling 100–150 %)
CameraIDS USB3 camera (IDS peak runtime required) or USB webcam-type (WDM) camera
DownloadKey featuresScreenshotsUser guideSpecificationsApplications

Free download

Click the button and the installer downloads straight away — no sign-up or GitHub account needed. Grab the user manual (PDF, 11 pages) too.

⬇ Download installer 73.6 MB
Version
v2.1
File
VISION-MANAGER-v2.1-Setup.exe
Size
73.6 MB
Released
2026.11.15
OS
Windows 10 / 11 (64-bit)
① Install first: IDS peak ↗ — Only needed for IDS cameras. USB webcam-type (WDM) cameras need no extra driver.

Key features

01

The ViCapture layout you know

The layout follows Vision Engineering ViCapture, so ViCapture users find the same controls in the same places. Measuring, magnification/calibration and reports are added in the third row of tabs, the measuring toolbar on the image and the capture tray on the left.

02

Measure right on the image

Point, line, circle, angle, distance and line-angle measurements in a few clicks, collected in a results table in mm and exported to Excel. Shortcut keys (S · P · L · C · A · D · G) switch tools instantly.

03

Image adjustment

Brightness, gain, exposure and gamma, auto exposure and white balance — and camera settings saved under a name and recalled in one click.

04

Focus aid · focus stacking

A sharpness meter shows where focus is best, and focus stacking merges several captures at different focus into one all-in-focus image.

05

Report sessions

Start a session with a recipe (report columns) and a barcode, collect a capture for each sample and export an Excel report — or insert images straight into the chosen cell of a customer Excel template.

06

Supervisor lock · Korean / English

Important settings such as calibration and file format are locked for the supervisor, and the UI runs in Korean or English. The last camera reconnects automatically at start-up.

작동 화면

Actual screens of the software (v2.1). Click a screenshot to enlarge it.

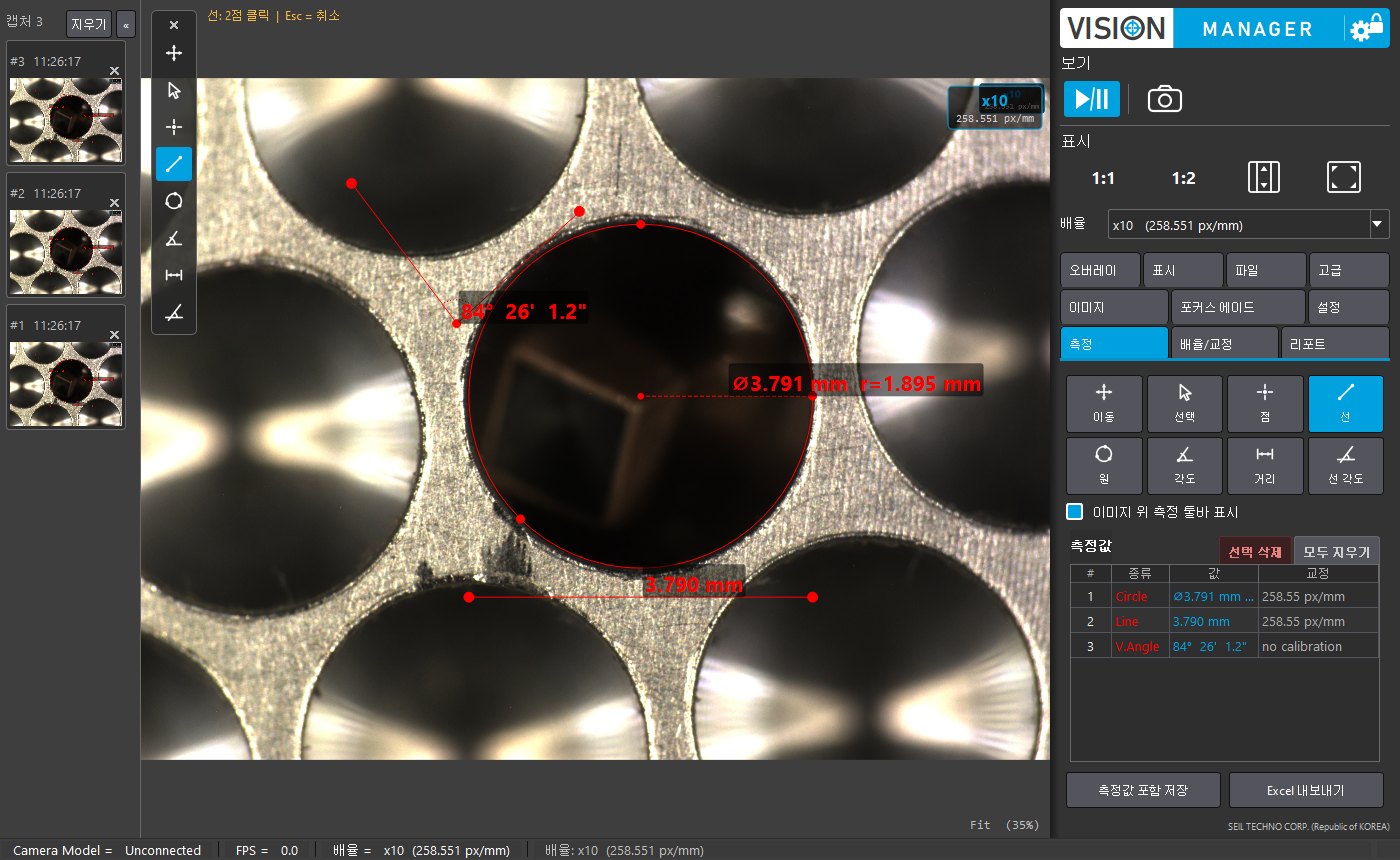
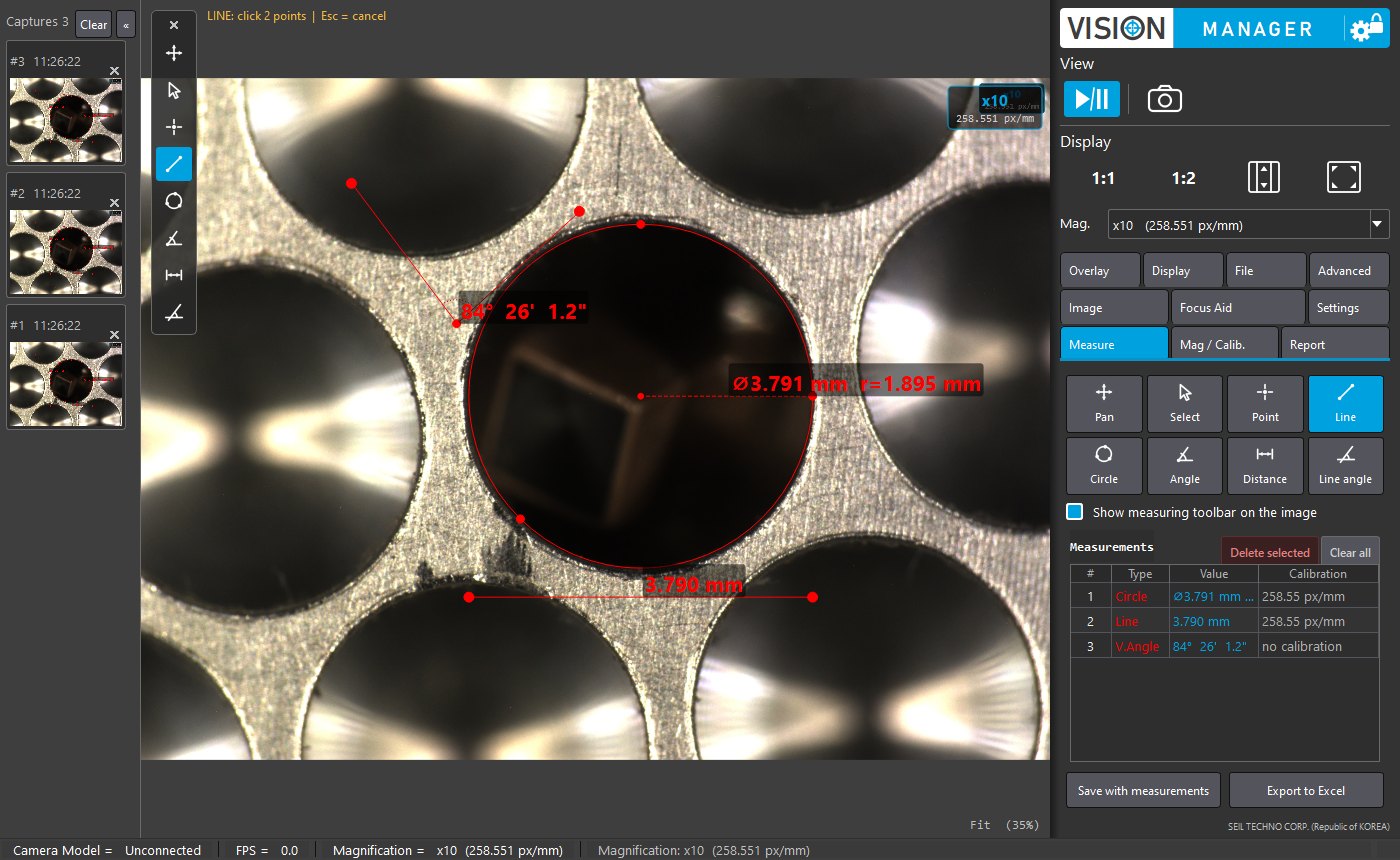
Main window (Measure tab)

Capture tray on the left, measuring toolbar on the image, right panel (View · Display · Magnification · three rows of tabs). Circle diameter, line length and angle are measured and listed in the table below.

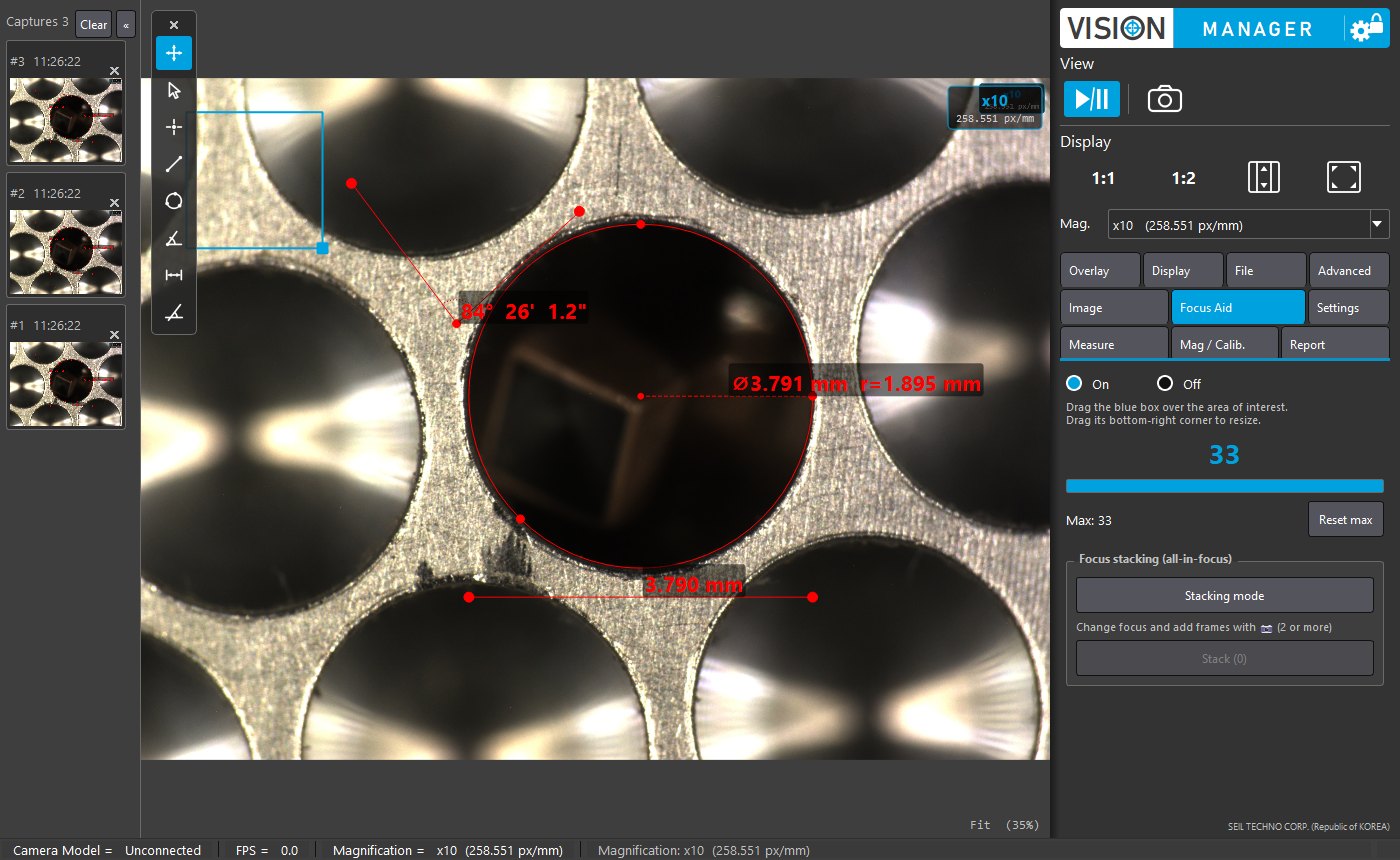
Focus aid
Focus aid

A sharpness meter for the blue rectangle helps you focus quickly.

Installation & user guide

The user manual (v2.1), feature by feature. First-time users can simply follow it from step 1. Click a screenshot to enlarge it; if you get stuck, call us at +82-2-2632-3211.

STEP 01

Installation

Click 'Download installer' above and the download starts straight away — no GitHub page in between. Run the downloaded file as administrator and follow the wizard.

  • For IDS cameras, install IDS peak from the IDS website first (otherwise the camera is not detected). Webcam-type (WDM) cameras need no driver
  • Right-click VISION-MANAGER-v2.1-Setup.exe → 'Run as administrator'
  • If the browser blocks the file as 'not commonly downloaded', choose … → 'Keep'; if a blue 'Windows protected your PC' box appears, click 'More info' → 'Run anyway'
  • Choose the UI language (한국어 / English) during setup. Icons are added to the desktop and the Start menu
  • Installing over an earlier version upgrades it in place; settings and calibrations are kept
STEP 02

Screen layout

Capture tray on the left, the image with its measuring toolbar in the middle, the right panel and the status bar at the bottom.

  • Capture tray — captured images, newest first; collapse it with «
  • Measuring toolbar — pick a tool at the top-left of the image; hide it with ✕ and show it again from the Measure tab
  • Image — wheel to zoom, drag to pan, double-click to fit
  • Right panel — supervisor lock / View / Display / Magnification / three rows of tabs / tab content
  • Status bar — camera model · FPS · magnification · messages · report session
STEP 03

Connecting the camera

In Settings → Camera, choose the type (IDS / WDM) and index, then click Connect. After the first successful connection, the same camera reconnects automatically at start-up.

  • Settings file — save camera settings (exposure, gain, gamma …) under a name and load them by selecting it (saving and removing need supervisor mode)
  • Language — choose 한국어 / English and restart the program
STEP 04

Image adjustment

Set brightness and colour in the Image tab. Click a value to type it in directly.

  • Auto Exposure On — set Brightness (target level); exposure and gain follow automatically
  • Auto Exposure Off — set gain and exposure yourself
  • Gamma — adjusts mid-tones (1.00 = no correction)
  • White balance — On (continuous) / Once / Off (keeps the last value)
STEP 05

View · capture · save

The camera button (Ctrl+S) saves the image exactly as shown — measurement lines, mark-up, crosshair and magnification label included — to the save folder, and adds a thumbnail to the tray.

  • ▶/II — live ↔ freeze (Space); 1:1 · 1:2 · fit · full screen (F11)
  • Shift+click the capture button to name the file
  • Tray thumbnails — click to enlarge, double-click to open in a new tab for measuring and mark-up
  • File tab — open images, save with measurements, export to Excel, auto-save, file format and save folder
STEP 06

Magnification & calibration

To read results in mm, first pick the objective magnification in use under Magnification at the top of the panel. It is shown at the top-right of the image and in the status bar.

  • New calibration (supervisor) — image a target of known length (e.g. a ruler), mark two points or edges to get px/mm, and save it as a magnification preset
  • Manage presets — rename, edit or delete
  • Calibrate each PC separately, and again whenever the microscope / camera combination changes
STEP 07

Measuring

Pick a tool in the Measure tab or on the measuring toolbar and click on the image. Results collect in the table below; record them with Save with measurements or Export to Excel.

  • Point (P) one click · Line (L) two points → length · Circle (C) three points on the edge → diameter and radius
  • Angle (A) end → vertex → end · Distance (D) between two measured objects · Line angle (G) angle between two lines
  • Select (S) — move measurements, labels and mark-up, or delete with Delete; Esc cancels the measurement in progress
STEP 08

Mark-up · overlays

Draw rectangles, ellipses, arrows and text in the Display tab, and switch on the crosshair and magnification label in the Overlay tab. All of them are included in saved images.

  • Choose colour, line width and font size before drawing
  • Crosshair colour can be changed in supervisor mode
STEP 09

Focus aid · focus stacking

Turn on Focus Aid, drag the blue rectangle to where you want focus, and turn the focus until the sharpness bar is longest. For samples with height differences, focus stacking produces an image that is sharp all over.

  • Stacking — turn on Stacking mode, capture two or more images at different focus → Run merge
  • The merged image appears in a new tab and in the capture tray
STEP 10

Reports

There are two modes. During a session, report slots are shown in place of the capture tray on the left.

  • Recipe Mode — choose a recipe and enter a Report ID (barcode) → Start Session → each capture fills the current slot, Add Slot moves to the next sample → Export Report creates the Excel file
  • User Excel Template — open the customer's Excel form, select a cell → Insert Image puts the current image there (Excel 2016 or later)
STEP 11

Supervisor mode

Click the padlock at the top-right and enter the password to enter supervisor mode. Click it again to lock; the program always starts locked.

  • Supervisor only — calibration and preset management, mirror and frame rate, crosshair settings, file format and save folder, saving/removing camera settings files, changing the password
  • After delivery or installation, change the password in Settings → Change supervisor password…
STEP 12

Shortcuts · troubleshooting

Frequently used keys, and what to check when something goes wrong.

  • Space live/freeze · Ctrl+S capture · Ctrl+Shift+S save with measurements · Ctrl+O open · Ctrl+E Excel · F11 full screen · Ctrl+Q quit
  • Camera not found → check IDS peak is installed, use a USB3 port, make sure no other program (e.g. IDS peak Cockpit) is using the camera, then Settings → Connect
  • Choppy or frozen image → supervisor mode → Advanced → lower the frame rate
  • No mm values → select a magnification (a calibration is needed)
  • Text cut off → Windows display scaling of 100–150 % recommended

Overview

VISION-MANAGER was developed in-house by SEIL TECHNO in response to requests from microscope inspection users. It captures images from the microscope camera, measures dimensions right on screen, and records the results as images and Excel reports.

Its layout matches Vision Engineering ViCapture, so existing users need no retraining, while measuring, calibration and reporting tools are added. It is free to download and use.

VISION-MANAGER currently supports IDS USB3 cameras and USB webcam-type (WDM) cameras. Please contact us if you need support for other cameras or custom features.

Specifications

DeveloperSEIL TECHNO CORP. (in-house)
SystemWindows 10 / 11 (64-bit), 8 GB RAM or more recommended
Display1920 × 1080 or higher (Windows scaling 100–150 %)
CameraIDS USB3 camera (IDS peak runtime required) or USB webcam-type (WDM) camera
MeasurementPoint, line, circle, angle, distance, line angle; results in mm; Excel export
Mark-up · overlaysRectangle, ellipse, arrow, text; crosshair; magnification label (saved with images)
Image adjustmentBrightness, gain, exposure, gamma; auto exposure; white balance; camera settings files
FocusFocus aid (sharpness meter), focus stacking
ReportsRecipe sessions (barcode) exported to Excel; images inserted into customer Excel templates (Excel 2016 or later)
OtherSupervisor lock, Korean / English UI, reconnects the last camera
DistributionFree — v2.1 installer (73.6 MB), user manual PDF (KO/EN) and online manual

※ Specifications are subject to change without notice. Please contact us for details.

Applications

Microscope image captureDimensional measurementAnnotating inspection imagesInspection reportsAlongside or instead of ViCapture

Want to see it in action?

Send us your samples or visit us, and we will demonstrate it for you.